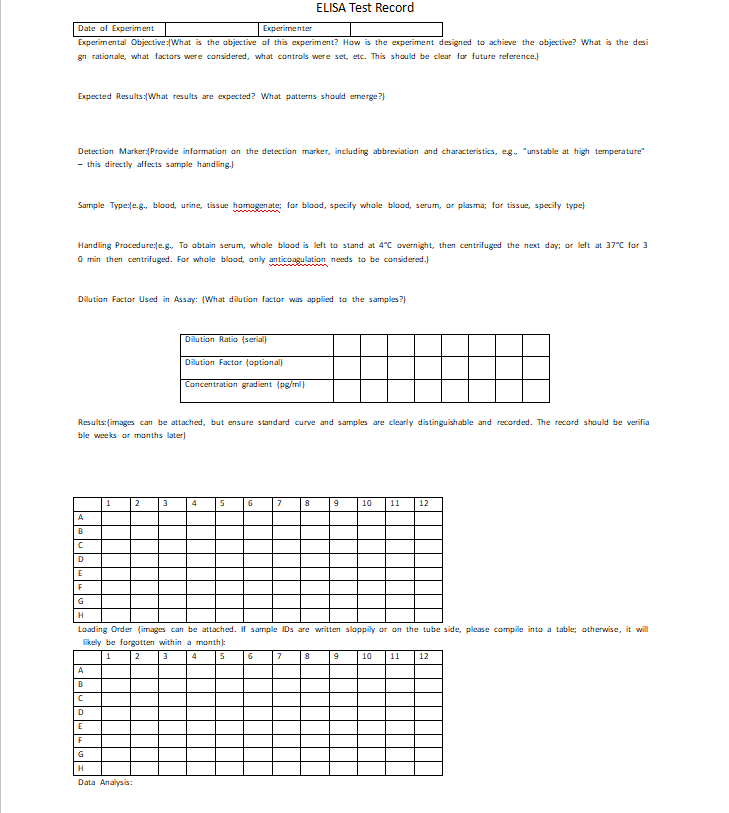
In the fast‑paced world of life science research, it is easy to focus solely on running the assay and obtaining results. However, one of the most overlooked yet critical steps in any ELISA workflow is record keeping. A well‑maintained ELISA experiment record is not just a log of what you did—it is a powerful tool for troubleshooting, data validation, collaboration, and future experimental design. Without clear records, a simple question like “What dilution did I use for those serum samples?” can become an unsolvable mystery.
In this guide, we will walk you through a structured approach to documenting your ELISA test records, from basic metadata to result analysis. Whether you are a graduate student running your first assay or a lab manager overseeing multiple projects, these practices will save you time, reduce errors, and make your data truly reproducible. For researchers who need a reliable source of high‑quality reagents, exploring the Yanda Bio ELISA kit catalog—with thousands of targets and fast custom options—can also simplify your documentation by providing consistent lot‑to‑lot performance.
Why Proper ELISA Record Keeping Matters
An ELISA generates multiple layers of data: sample identities, dilution factors, incubation times, washing parameters, standard curve values, and raw absorbance readings. If any of these details are missing or unclear, your final concentration calculations may be unreliable or impossible to verify. Good records allow you to:
- Trace errors back to a specific step or operator
- Replicate experiments exactly, even months later
- Share data with collaborators without endless back‑and‑forth
- Troubleshoot unexpected results systematically
- Train new lab members with real examples
Let us break down the essential components of a complete ELISA lab record.
1: Basic Information – The Who, When, and Why
Every record should start with fundamental metadata. These details may seem trivial, but they are the first things you will need when revisiting an experiment.
1.1 Date and Time
Record the date of the experiment. If your protocol involves precise incubation times (e.g., exactly 60 minutes at 37°C), also note the start and end times to the minute. This is especially important when troubleshooting timing‑related issues.
1.2 Operator Name(s)
If multiple people are involved in the assay (e.g., one person prepares samples, another runs the plate washer), list all names. When an issue arises, knowing who performed each step helps focus the investigation.
1.3 Experiment Objective
Write down the goal of the test. For example: “To measure serum IL‑6 levels in LPS‑treated mice compared to controls.” Including your expected outcome (e.g., “IL‑6 should be elevated in treatment group”) creates a benchmark against which you can later assess whether the results make biological sense.
2: Experimental Details – The How
This section captures the technical parameters that directly affect your results.
2.1 Detection Target and Kit Information
Clearly state the analyte (e.g., mouse IgG, human TNF‑α) and the kit lot number. Lot numbers are critical because even kits for the same target can have slight variations between batches. If you are using a Yanda Bio ELISA kit, record the catalog number and lot ID for future reference.
2.2 Sample Dilution Factors – The Most Critical Parameter
In ELISA, raw optical density (OD) values are meaningless without knowing how much the sample was diluted. For example, a sample with an OD of 0.2 that was tested neat (1:1) contains far less analyte than a sample with an OD of 0.4 that was diluted 1:8. Always record:
- Dilution factor for each sample or group (e.g., 1:5, 1:20, 1:100)
- Diluent used (typically the sample diluent provided with the kit)
- Dilution scheme (e.g., two‑step 1:10 then 1:100)
Why this matters: Without dilution records, you cannot calculate absolute concentrations. A common mistake is to record only the final dilution factor but not the intermediate steps. Write it all down.
2.3 Standard Curve Preparation Details
The standard curve is the backbone of quantitative ELISA. Document:
- Concentration of the top standard (highest point)
- Serial dilution factor (e.g., 2‑fold, 3‑fold)
- Number of standard points (usually 7 plus a blank)
- Diluent used for standards
Important note: Different ELISA formats use different dilution factors. Sandwich ELISA kits often use 2‑fold serial dilutions, while some competitive ELISA kits require 3‑fold dilutions. If you mistakenly use the wrong dilution factor, your standard curve will be invalid. Recording exactly what you did allows you to catch such errors during data analysis.
2.4 Incubation and Washing Conditions
Note any deviations from the kit manual, such as:
- Incubation temperature and duration
- Number of wash cycles and wash volume
- Whether the plate was sealed and placed in a humidified chamber
3: Raw Data – The OD Values and Plate Layout
3.1 Plate Map
Create a clear plate layout diagram indicating which wells contain standards, blanks, controls, and samples. Use well coordinates (e.g., A1, B2) and assign each a unique identifier. This is essential because weeks or months later, you will not remember what was in well C7.
3.2 Raw Absorbance Readings
Record the OD values at 450 nm (and reference wavelength if used). You can write them directly into a lab notebook or, more efficiently, paste them into an electronic spreadsheet. Keep both the raw data and the calculated results.
3.3 Order of Addition
If you added samples or reagents in a non‑standard order (e.g., not row by row), note that as well. The order can affect incubation timing for the first vs. last wells.
4: Results and Analysis – Learning from Success and Failure
4.1 Standard Curve Performance
After plotting the standard curve, record:
- R² value (should be ≥0.98 for reliable quantification)
- Back‑calculated standard concentrations (to assess accuracy)
- Any obvious outliers (e.g., a standard point that deviates significantly)
4.2 Sample Concentration Calculations
Document the dilution‑corrected concentrations for your samples. If you used different dilution factors for different groups, clearly label them.
4.3 Interpretation and Notes on Unexpected Results
This is where many researchers stop, but adding a brief analysis is invaluable. For example:
*“The standard curve was excellent (R²=0.995), but all samples diluted 1:8 gave OD values below the lowest standard. I suspect the target concentration is very low in these samples. In the next experiment, I will test undiluted and 1:2 diluted samples.”*
“The blank wells showed unexpectedly high background. Upon checking my records, I realized I used PBS instead of the provided sample diluent for washing. That likely caused non‑specific binding.”
Do not be afraid to document failed experiments. In fact, failed experiments often teach you more than successful ones. Recording what went wrong and how you fixed it creates a valuable knowledge base for your entire lab.
5: Best Practices for Long‑Term ELISA Record Keeping
5.1 Choose a Consistent Format
Whether you prefer a paper notebook, a Word document, or an Excel spreadsheet, use the same template every time. Consistency makes it easy to compare experiments.
5.2 Keep Electronic Backups
If you use paper records, scan or photograph them regularly. If you use digital files, back them up to a cloud or lab server.
5.3 Include Troubleshooting Notes
Whenever you encounter a problem (e.g., high background, poor curve linearity), write down what you tried and what worked. Over time, you will build a personalized ELISA troubleshooting guide.
5.4 Annotate Your Plate Reader Output
Most plate reader software allows you to add comments to each well. Use this feature to flag unusual wells or note dilution factors directly in the data file.
How Good Record Keeping Supports Better ELISA Results
Clear, detailed records do more than just satisfy good laboratory practice—they actively improve your science. When you can trace back every parameter, you can:
- Validate your own work when preparing manuscripts or theses
- Respond to reviewer questions about experimental conditions
- Transition projects seamlessly when team members change
- Optimize protocols by comparing what worked in past experiments
For labs running multiple ELISA targets, having a standardized record‑keeping system is especially beneficial. Pairing it with high‑quality, consistent reagents further reduces variability. Explore Yanda Bio’s ELISA kit collection, which offers thousands of validated targets across human, mouse, rat, rabbit, and more.
Yanda Bio: Your Partner in Reproducible ELISA
At Yanda Bio, we believe that great data start with great reagents—and great records. Our ELISA kits are manufactured under strict quality control, with lot‑specific certificates of analysis that make your documentation easier.
- Extensive menu: Thousands of targets covering immunology, oncology, neuroscience, metabolism, and infectious diseases
- Custom ELISA development: Need a kit for a novel target? We can develop and deliver a custom ELISA kit in as little as 5–7 business days
- Affordable pricing: Standard kits from just $120, with bulk discounts available
- Technical support: Our scientists are ready to help you optimize your protocol and record‑keeping
Whether you are measuring mouse cytokines, human immunoglobulins, or rat biomarkers, Yanda Bio provides the reliability you need. For unique projects, our custom ELISA service offers fast turnaround without compromising quality.
Summary: Your ELISA Record Checklist
| Section | What to Record |
|---|---|
| Basic info | Date, time, operator name(s), experiment objective |
| Kit & target | Analyte name, kit catalog number, lot number |
| Sample details | Dilution factors, diluent used, sample IDs |
| Standard curve | Top concentration, dilution factor, number of points |
| Protocol steps | Incubation times/temperatures, wash cycles/volume |
| Plate layout | Well coordinates for standards, blanks, samples |
| Raw data | OD values (450 nm), blank subtraction |
| Results | Calculated concentrations, R², any outliers |
| Analysis | Interpretation, troubleshooting notes, next steps |
Final Thoughts
An ELISA test is only as good as the records that accompany it. By taking a few extra minutes to document each experiment thoroughly, you save hours of future confusion and ensure that your data can withstand scrutiny. Start with the template outlined above, adapt it to your lab’s needs, and watch your reproducibility improve.
For high‑performance ELISA kits that come with clear documentation and reliable lot‑to‑lot consistency, choose Yanda Bio. With thousands of targets and rapid custom development, we have the right solution for your research.